
You're at the shop before daylight because a fence is down and the far pasture won't wait. The same rocky, muddy line you use in hunting season is the only way in, and the side-by-side is loaded with tools, not toys. That's 4 wheelers trail riding when the machine is part of the work. A quiet motor doesn't flatten a side slope, and it doesn't make a closed route legal. I would settle three questions before I think about speed: is the route open for this machine today, will the battery get you back, and will the cab and the belts hold everyone if a tire climbs a rock you didn't see.
Table of Contents
- Route Legality and Trail Etiquette
- Electric UTV Range, Charging and Torque
- Pre-Ride Checks and Maintenance Intervals
- Gear and Passenger Rules Before the Trail
- How to Handle Slopes, Turns and Obstacles
- What to Do If You Roll, Get Stuck or Break Down
- Final Go or No-Go Checklist Before You Ride
Route Legality and Trail Etiquette
A gate can be open and the trail beyond it still closed. Before hauling a UTV to a hunting area, ranch access road, or public trail, confirm that the route allows your vehicle class and is open on the day you plan to ride. Electric power does not exempt a UTV from motorized-vehicle rules.
Colorado's Bureau of Land Management Uncompahgre Field Office closes some motorized routes from December 1 through March 31 to protect wintering big game, while other areas have closures extending into May for erosion, habitat, or sage-grouse protection. Many national forests and state land units also require permits for ATVs and UTVs and close trails seasonally. Check the local office for current requirements and notices.
Pull up the current rules before the trailer moves:
- Motor vehicle map: Use the land manager's current map for that unit, not a screenshot from last season.
- Closure notices: Check the dates and the exact route. A trail open in one season may close for wildlife protection or muddy conditions in another.
- Permit and vehicle class: Confirm how the local office classifies your electric UTV and whether that class needs a permit.
- Width limit: Measure the machine against the route's limit. A cab that fits a ranch lane may be too wide for a designated trail.
- Wildlife closures: Follow closures for big game or grouse. A quiet motor does not make a closed route legal.
Etiquette helps keep access open. Yield to hikers, horses, and riders already on the trail. Pass slowly, stay on the designated route, and leave gates as you found them. Keep speed down where dust could reach homes or hay ground, and avoid unnecessary throttle near hunting properties.
Practical rule: If last month's map and today's closure notice disagree, follow the notice for your ride date.
Park roads may have different restrictions from OHV trails. Guides to weekend outings in Texas state parks show how tightly a state park can limit vehicle access. A side-by-side allowed on a designated trail may still be barred from a park road. Check the closure map and permit list for the specific route before loading; if either is unclear, postpone the trip.
Electric UTV Range, Charging and Torque
The number on the spec sheet is a best-case ride: light cargo, mild air, and ground that doesn't climb. Trail work isn't that ride. A loaded machine that climbs, tows, and sits in four-wheel drive will spend charge much faster than the headline, and planning the day on the advertisement is how you end up walking out with a dead pack and a bed full of gear.
Independent guidance from Landmaster identifies cold weather and steep inclines as conditions that reduce electric performance, notes that gas models can outperform electric models in extremely cold or steep terrain, and gives an approximately eight-hour charge time from a standard 110V outlet for one electric UTV example. That discussion also cites a Consumer Product Safety Commission finding that 60% of injuries occurred on flat terrain and 85% on dry terrain, which is a reminder that a short, "easy" loop still has to be planned with a reserve, not ridden until the gauge looks ugly.
What eats the battery
| Factor | Effect on range | Planning response |
|---|---|---|
| Steep climbs | Uses charge faster than flat ground | Count each climb twice in the range budget |
| Cold weather | Lowers available capacity and performance | Plan shorter loops and warm the battery before riding |
| Payload and towing | Extra load draws more power | Limit cargo and trailer weight on long routes |
| Sustained 4WD | Higher drive load in soft or steep sections | Use 4WD for obstacles, not the whole ride |
| Winching or recovery | Heavy current draw in short bursts | Keep return reserve for any recovery |
| Standard 110V charging | About eight hours for one example unit | Charge overnight before a full-day trip |
| Headline maximum range | Advertised figure under ideal conditions | Plan against the reserve, not the headline number |
Build the return reserve
Say the headline figure is 60 miles. I would plan the day on about 30 miles of riding, count each steep climb twice, and keep a return reserve large enough to reach the trailhead or a charger even if the loop runs 20 percent longer than you drew it. Write that reserve number in the trip log before you leave. A winch pull or a tow is another line in that log, not something you invent after the machine is buried.
Instant electric torque is useful on a slow climb because the motor is already making pull at walking speed. It also makes the pedal sharp. Roll into every slope. A sudden hit of torque on a side slope is how a tire digs, the chassis leans, and a routine crossing becomes a tip. Plug in the night before. An eight-hour 110V charge started at breakfast will not be finished when you need to leave.
Pre-Ride Checks and Maintenance Intervals
A loose tie rod or soft brake pedal can turn a routine trail ride into a rollover risk, especially when a tire catches a rock or rut. Walk around the UTV before every ride, starting at one corner and checking each tire, brake, steering joint, and connection before moving on.
Set tire pressure to the vehicle placard. Look for cuts and damage around each bead. Check that the brake pedal feels firm and that the parking brake holds on level ground. Inspect tie rods and ball joints for play, and shocks for leaks. On an electric UTV, check the charge level and look over the battery connections and cables for corrosion or damage.
What to inspect and when
| Check | What to inspect | When |
|---|---|---|
| Tires | Pressure per placard, cuts, bead seal | Before every ride |
| Brakes | Pedal firmness, parking brake holds | Before every ride |
| Steering and suspension | Play in tie rods and ball joints, shock leaks | Before every ride; full check monthly |
| Brake fluid and coolant, if fitted | Check levels and condition per owner's manual | Before every ride; service per owner's manual |
| Belts or drive | CVT or drive belt wear, cracks, glazing | Weekly in season |
| Air filter | Dust loading after dusty rides | After each dusty ride |
| EV battery and connections | Charge level, terminal corrosion, cable condition | Before every ride |
| Drive modes and lock | 2WD/4WD engages, rear differential lock works | Before every ride |
| Winch and hitch | Spool, cable condition, hitch pin and ball | Before every ride |
| Seat belts and harness | Latch engages, webbing free of cuts | Before every ride |
Test 2WD, 4WD, and the rear differential lock on safe, level ground. Check that the winch cable spools cleanly, the hitch pin is secure, and each seat-belt latch works. Set a monthly service rhythm for a closer look at steering, shocks, and filters during the riding season. A breakdown of UTV maintenance costs can help you account for routine service.
Write the hours down
Log operating hours, dusty or wet rides, and maintenance. Use the owner's manual for service intervals, and record each completed job. Dust can load an air filter, while repeated wet rides call for closer inspection of exposed parts. A written record makes it easier to catch wear before it becomes a trailside failure.
Gear and Passenger Rules Before the Trail
Pack the kit that still works when you're an hour from the truck, then make every person in the cab follow the same rules.
- Helmet and eyes: A DOT-rated helmet with goggles or a face shield. Brush and a thrown rock don't care that you "know this trail."
- Hands and feet: Gloves and over-the-ankle boots. Sandals and a loose sleeve are how people get hurt on a grab handle.
- Cover: Long sleeves and pants. They take the scrape when you have to step out in rock or brush.
- Water: Enough for the planned time out, plus a margin if the loop runs long.
- Stop-and-fix kit: A first-aid kit, a whistle, a charged phone with offline maps, a fire extinguisher, a tow strap, a shovel, and traction boards.
Every passenger wears a seat belt before the wheels move. Hands and arms stay inside the protective structure. Nobody rides in the cargo bed, on the roof, or on a tailgate, even for "just to the gate." A person back there has nothing to hold them when a tire drops into a rut.
Passenger count comes from the owner's manual, not from how many people can physically sit. If the manual says two, the third person walks or waits. Youth riders need a machine sized for them and an adult who is watching, not a full-size work UTV because they can reach the wheel. Age and seating limits in that manual are the rule for your group.
At the trailhead, run the kit out loud together. Belts clicked, water in the cab, phone charged, recovery gear where someone other than the driver can reach it. If a latch doesn't catch, you fix it in the parking area.
A loose passenger is harder to help than a stuck tire.
How to Handle Slopes, Turns and Obstacles
A firm trail can turn dangerous where a hillside narrows, a rut cuts across the line, or a blind crest hides loose rock. UTVs can roll on slopes and in sharp turns, even at low speeds, so treat each change in terrain as a stability decision. The research on off-highway vehicle stability supports a cautious approach: assess the route, select 4WD before traction gets difficult, and avoid abrupt steering or throttle.
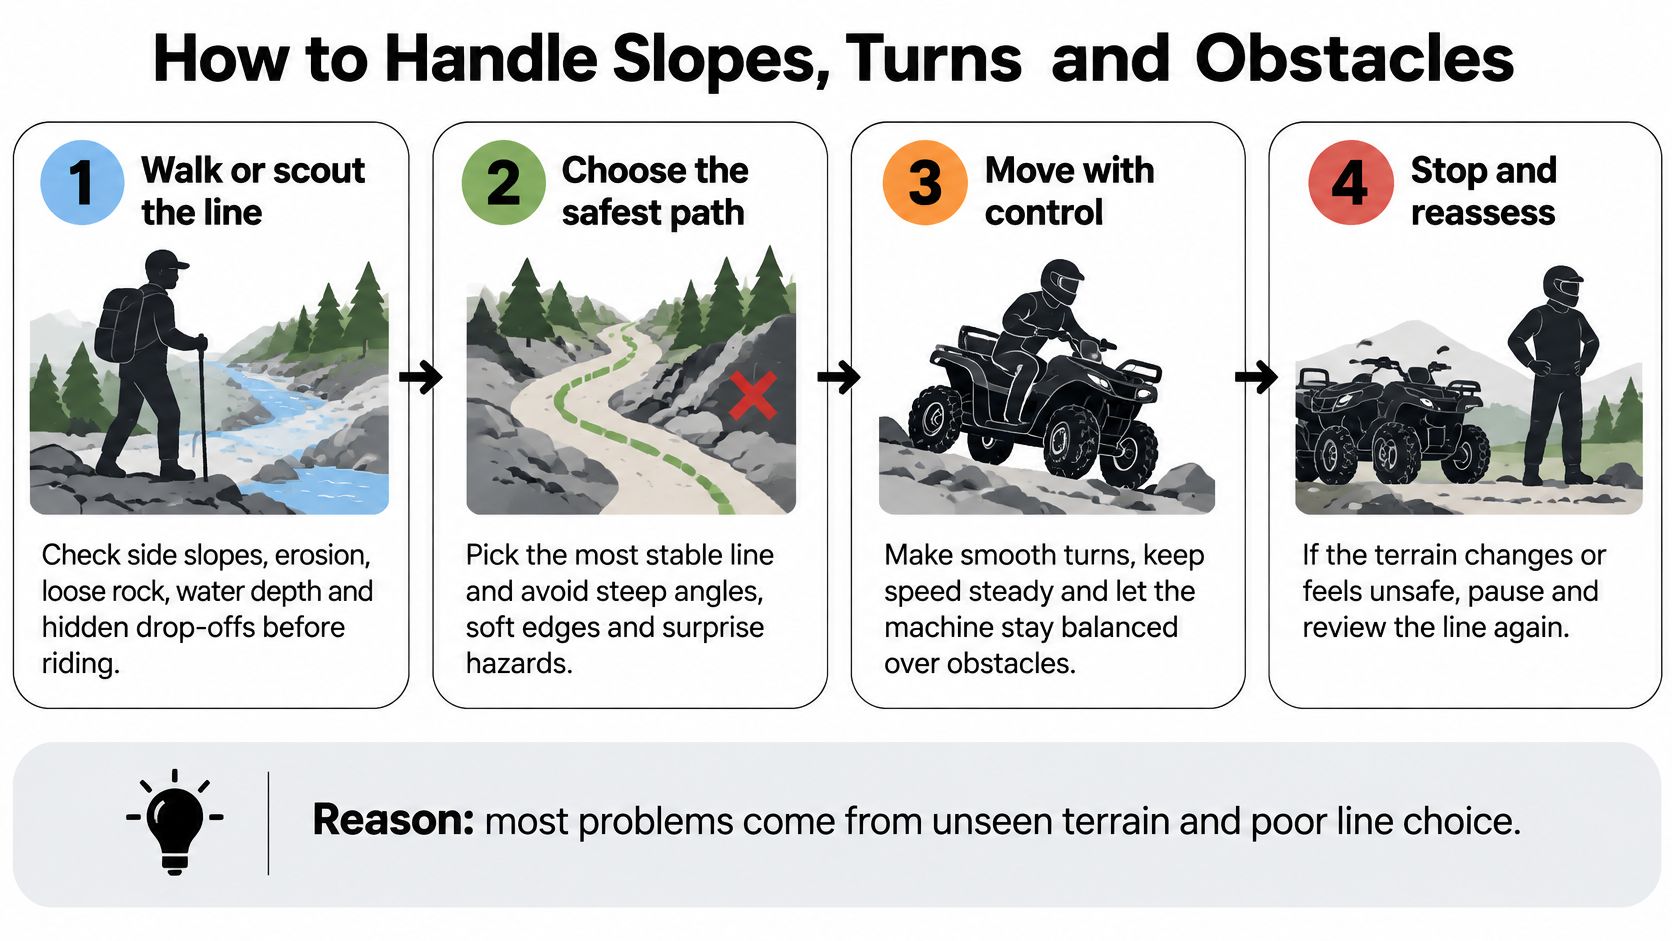
Seven moves that keep the machine upright
- Scout the line. Check for side slopes, washouts, loose rock, water depth, and hidden holes. If the route looks unstable on foot, choose another line.
- Select 4WD before the obstacle. Set the drive mode before a climb or soft patch, not halfway through it. Spinning tires can cost you control when you need it most.
- Brake before a turn. Slow in a straight line, then steer smoothly. Turning at speed shifts the machine's weight and raises rollover risk.
- Climb straight up the fall line. Crossing a steep grade loads the downhill tires and can lift the uphill ones.
- Descend slowly and stay aligned with the slope. Avoid sharp steering or braking that can make the rear slide sideways.
- Cross water only when you know the bottom. Keep a steady pace. A hidden hole or slick shelf can unsettle the UTV.
- Stop at a blind crest or lifted wheel. Don't add throttle to push through. Back out under control or reassess the route.
Logs, ruts, and mud
Approach a log square and use steady throttle so the front tires meet it together. In a rut, follow the groove rather than steering up its wall. In mud, avoid wheelspin that digs the tires deeper; ease off and reassess if traction breaks. These UTV tire reviews cover how tread choice affects grip. Four-wheel drive helps with traction, but it does not make a risky line safe.
Rollover risk rises when a machine enters a side slope too fast, turns across a steep grade, or hits an unseen obstacle. Choose a line that keeps the UTV stable, and stop if the terrain changes before you can see a safe way through.
What to Do If You Roll, Get Stuck or Break Down
If the machine is on its side, nobody climbs out to "see the damage" until you've checked the people. The picture below is the order that matters: people first, then the energy in the machine, then the mess on the ground.
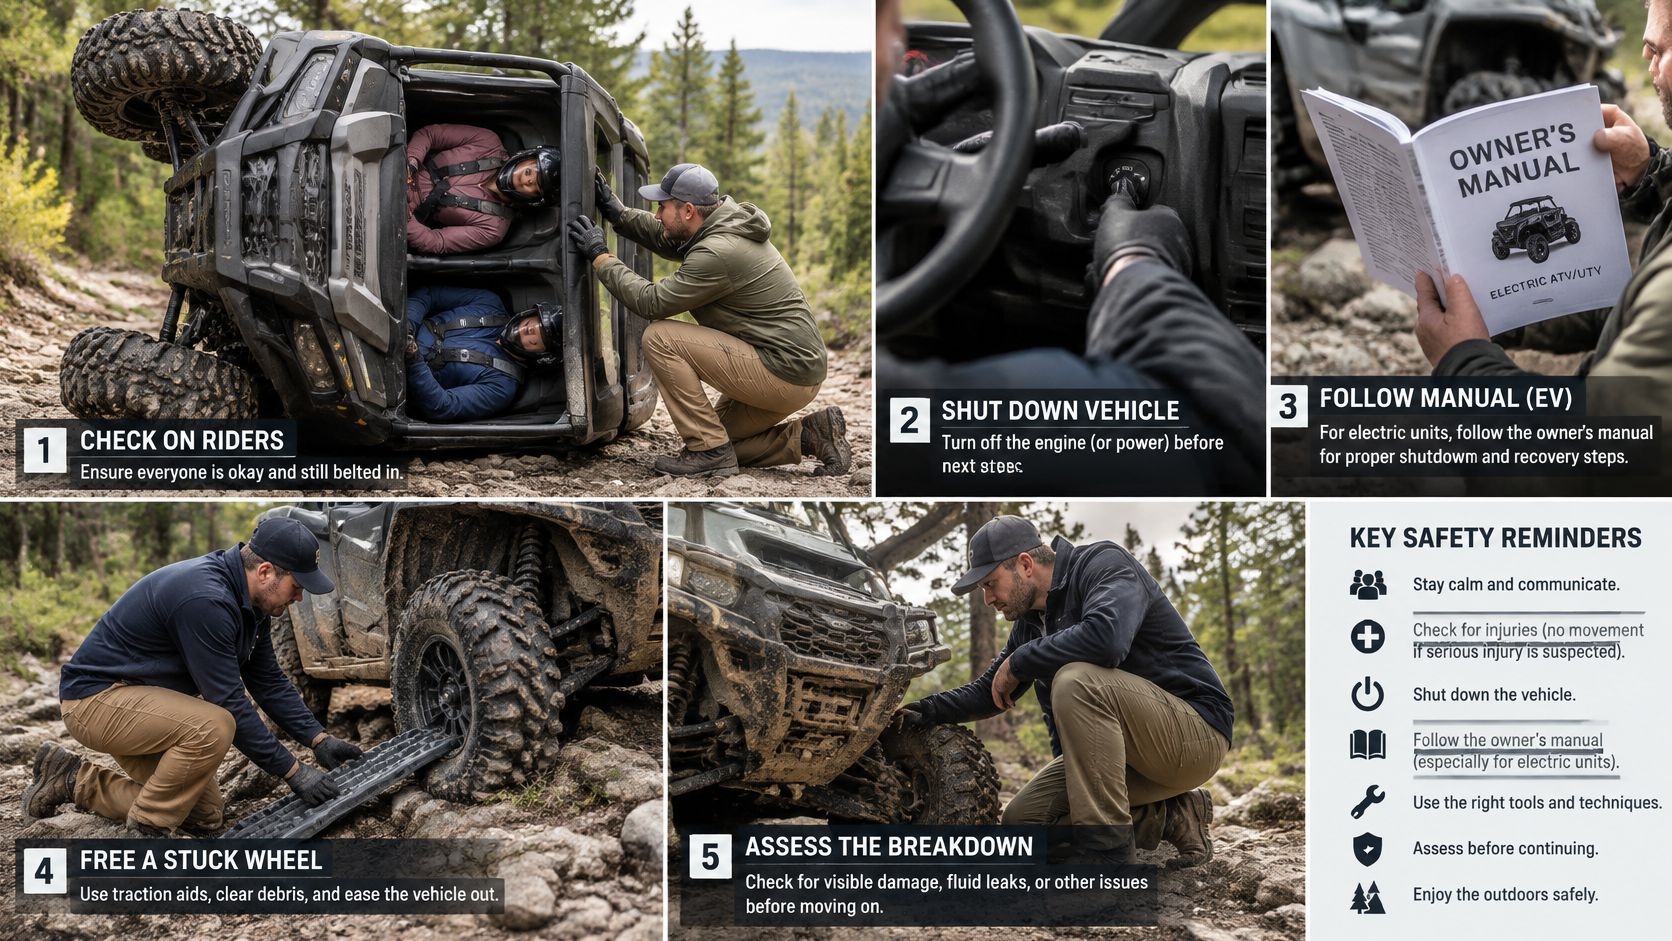
When the machine is on its side
- Stay belted until someone checks each person. A second fall while you're unbuckled, or a neck you moved too soon, is worse than waiting thirty seconds.
- Shut it down. On an electric UTV, follow the owner's manual for isolating the high-voltage system. Don't improvise with cables you haven't trained on.
- Look for leaks. Fuel, coolant, or battery fluid means people move uphill and upwind before anyone discusses a tow.
- Call and send a position. Share a GPS pin with someone who can reach you, not only with the group chat.
Backing out beats driving forward once a wheel is light. Forward throttle loads the outside tires and finishes the roll. Reverse, at idle, lets the high side settle back onto the ground you already drove.
This short clip walks through a controlled recovery mindset before you ever need the strap in anger.
When you're stuck or out of charge
Stop spinning. Digging just buries the axle. Try a locked differential or a lower-speed four-wheel mode before you reach for the winch. Shift cargo, and if the manual allows, step passengers out and clear of the machine so the tires have less to pull.
Winch only to a solid anchor, with a tree-saver strap so you don't girdle the tree. Everyone stands outside the line's path. A cable that parts will cut whatever is in line with it. The hardware that belongs on the machine before that moment is listed with these off-road essentials.
If the belt is done or the pack is too low to get home, stay with the vehicle in the shade or another safe spot. Save a GPS pin and text it to your group. Call a tow or your recovery contact and wait. Walking out "to save time" is how a known position becomes a search.
Final Go or No-Go Checklist Before You Ride
Run this the night before, at the kitchen table, not in the trailhead dust with everyone already impatient.
- Route: The trail is legal and open on your dates. You have the closure map and the permit that matches your vehicle class.
- Weather: Rain, cold, or wind is checked. If cold or a longer mud detour would push the battery reserve below the number you wrote down, you shorten the loop or you don't go.
- Charge: The pack charges to full overnight, and you recalculate the return reserve. On a Campus E1, that pack is a 72V 150Ah lithium battery behind a 20 kW motor, with on-demand 2WD/4WD and an electric power dump bed, and the machine can go up to 60 miles on a single charge. I would still plan the work day on about half of that headline, the same way I would on any electric UTV. If you want seat time on one before you commit it to ranch work, find a Campus EV dealer near you and book a test drive.
- Machine and kit: The walkaround is done on the UTV and the trailer, and the gear list is in the cab.
- A person off the trail: Someone at home has the route, the expected return, and who to call. On remote ground, nobody rides alone.
- Turnaround time: If you're behind that clock, or the reserve is already under plan, you turn back before the next climb.
A no-go tonight is cheaper than a recovery tomorrow. Run the list while you can still change the plan.
Campus EV builds electric UTVs for the hunting, farm, and ranch trails this kind of day calls for, with four-wheel drive you can select when the ground goes soft and a cab meant for work rather than a racetrack. If you're replacing a gas side-by-side or adding a quieter machine for property chores, look through the lineup and dealer network at Campus EV and book a test drive before you pick a route that has to bring you home.